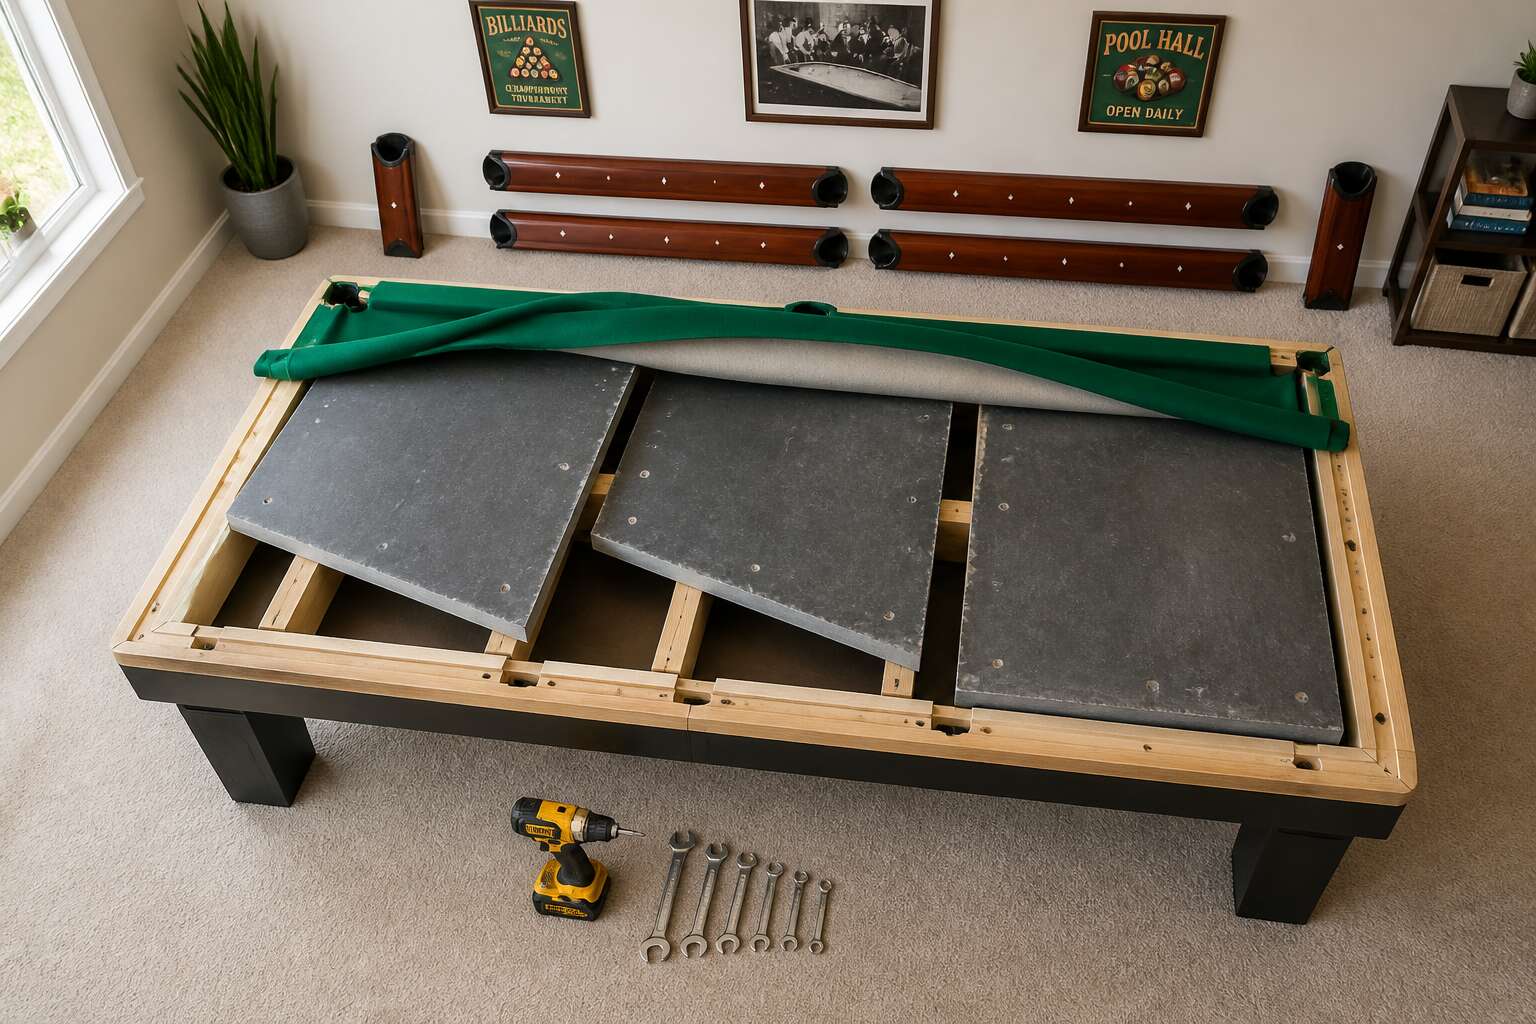
Pre-Move Inspection and Tool Assembly
Assessing Table Type and Construction Style
Before you start dismantling, pause. A pool table is not a flatpack wardrobe from a certain Swedish megastore. It has opinions. First, identify the construction style. Slate tables are the heavyweight champions, often weighing 500 kilograms plus. MDF or particle board tables are lighter, but they hold screws like a sieve holds water.
Check the frame. Brazilian rosewood or stained pine? Each demands different tooling. You will need sockets, Allen keys, and a rubber mallet for stubborn joints. Do not forget the chalk. Not for marking, but for dramatic effect. In South Africa, many tables are built for coastal humidity, meaning swollen bolts.
- Look for visible bolts under the rails
- Check if the slate is one piece or three piece
Knowing how disassemble pool table correctly starts with respecting these differences. A misread frame style could turn your move into a timber explosion.
Checking for Loose Bolts, Levelers, and Frame Damage
Before you lift a single socket, inspect the beast. A table that rattles today causes misery tomorrow. The frame tells the truth. Loose bolts mean the timber has shifted, and levelers that spin without resistance hide a twisted base. I have seen tables look solid at a distance and crumble at a touch.
Run your fingers along the frame joints. Check for gaps. Pull on the rails gently. Use a spirit level across the slate if you can. Frame damage changes how disassemble pool table safely.
Here is what to look for:
- Bolts that turn without tightening
- Levelers that sink or wobble
- Water stains or swelling around the feet
That last one signals coastal humidity. A swollen leg will not come out clean.
Gathering Specialized Tools and Safety Gear
The quiet before a dismantling holds its own menace. A pool table waits with a patient weight, and the tools you assemble determine whether the encounter ends cleanly or in catastrophe. Pre-move inspection is reconnaissance, not ritual. Walk the perimeter, note the sag in the cloth, the way the slate shifts when pressure is applied. That intelligence shapes how disassemble pool table without injury to the frame or your back.
Gather your arsenal with intention:
– A socket set with extensions for buried bolts
– A magnetic parts tray to keep screws from disappearing
– A rubber mallet for stubborn joints
– Safety glasses and work gloves
Each item earns its place. A missing wrench turns a clean operation into a frustrated wrestling match. The slate alone can exceed two hundred kilograms, so it demands reverence before you touch a single rail. Plan for the weight, and the table will surrender its secrets one piece at a time.
Clearing the Surrounding Area for Safe Disassembly
Clearing the surrounding area is the first true act of dismantling. A room arranged for playing is rarely arranged for extraction. You need an open radius of at least two metres around every rail. Move the potted fern, the bar stools, the cue rack! Roll up any rugs beneath the table, they will snag on the slate and turn a careful lift into a disaster. I always walk the route from table to exit and remove every obstacle before touching a single bolt:
- Slide the table away from walls if the legs allow it.
- Open all doors along the exit path and secure them with wedges.
- Cover door thresholds and floor surfaces with cardboard.
- Remove wall hangings that could catch on a slate corner.
The mechanics of how disassemble pool table become safer when the room cooperates. Use old blankets to cushion the floor where the slate will rest. The process is not complicated, but it demands attention.
Clearing the Playing Surface and Rail Removal
Removing Balls, Pockets, and Corner Castings
Most people assume the playing surface comes off first. In reality, the rails and pockets are your true starting point. Begin by sweeping the felt clean of chalk and rolling stray balls into a tray. Then examine the rails, the wooden or metal bands framing the bed. Each rail typically fastens with two to three screws. Remove those and the entire frame lifts away.
Pockets need a separate pass. Some clip into the rail, others screw in from beneath. Corner castings, the brass or plastic guards at each corner, come free after the pocket brackets are released. This order works consistently:
- Remove the balls and set them aside.
- Unclip the pockets from the rail.
- Unscrew the corner castings.
- Lift the rails off the slate or wood bed.
Keep every screw in a labelled container. The fasteners look identical but rarely interchange. Knowing how disassemble pool table parts in this sequence protects the surface and saves hours of rework.
Detaching Cushions and Rail Bolts in the Correct Order
After the pockets and castings clear the frame, the bed demands one last sweep. Chalk dust and crumbled cue tips will scratch the cloth if they shift during disassembly. Lay a soft sheet over the surface and tape it down at the corners. This simple barrier keeps grit away from the slate seams.
The rails carry their cushions still attached. Removing cushions beforehand only creates rework. The bolts sit beneath the rubber, hidden until you flex the cushion upward. Learning how disassemble pool table rails properly means releasing tension in stages. Loosen every bolt a half turn before pulling any one completely.
Work in a clockwise path:
– Start at the head rail and remove its bolts completely.
– Alternate between the two side rails.
– Leave the foot rail for last.
Lifting each rail away from the slate, keep it flat. Dragging the rail edge scrapes the felt and misaligns the bolt holes. Each rail leaves the frame with its own hardware, ready for the table to drop into pieces without a single stripped thread.
Lifting Rails Safely Without Damaging the Cloth
The playing surface deserves a moment of silence before you yank anything. Check for stray chalk, a rogue ball, or a bent coin that somehow crawled under the cushion. These tiny objects cause damage when a rail drops. To understand how disassemble pool table properly, you must respect the cloth. Place your hands under the rail’s ends, not the middle. Raise it straight up, then tilt slightly away from the slate. Never slide the rail across the felt. That drag presses chalk dust into the weave.
The rail will try to twist. Use your knees for support and keep the rail level. If you feel resistance, stop and investigate. Forcing a rail over a bump can tear the cloth. Treat the surface with patience, and it will reward you with a clean result.
Labeling and Storing Rails and Pocket Hardware
With the rail lifted free, the slate surface sits exposed. Sweep a dry cloth across the seam lines to catch grit that shifted during removal. Knowing how disassemble pool table the right way means handling every component with the same care you gave the cloth.
Labeling prevents costly mistakes. Every rail looks identical until you try fitting it to the wrong corner. Follow a simple sequence:
- Press painter’s tape onto each rail.
- Write the position, such as head or foot.
- Number them clockwise from the head rail.
Pocket hardware demands equal attention. Never dump bolts into a single heap. Each pocket uses specific screws and washers. Place hardware in small resealable bags, one per pocket, and keep the bags with their matching castings.
For storage, lean rails against a padded wall. Never stack them. The cushion rubber compresses under weight and loses its rebound. Wrap each rail in a blanket for transport. These steps demonstrate how disassemble pool table without damaging parts.
Inspecting the Cloth for Existing Wear Before Staples Are Pulled
Run your palm across the cloth before a single staple lifts. The felt records everything. A faded path between the foot spots means years of serious play. A rough patch near a pocket could hide a spilled drink. These clues tell you exactly where to be careful.
Clearing the playing surface takes more than sweeping off chalk dust. Use a soft brush to remove debris from the seams, then inspect the cloth under direct light. Look for loose fibers or tears along the rail edges. This inspection prevents accidental rips when you pry the staples away. If you spot a weak area, adjust your angle and pull gently with the grain.
That small act of patience is the difference between a reusable cloth and a torn one. It is the precise moment where most people learn how disassemble pool table properly.
Slate Bed Disassembly and Frame Breakdown
Stripping the Felt and Handling Staple Patterns
The slate bed is the cold heart of the table. Once the rails are gone, you face the felt, which is pinned down by a hundred tiny staples. Removing it requires patience, not force. Work the cloth loose from the centre outward, rolling it away from the slate like a shroud.
- Pry the first staple at a 45 degree angle.
- Work in rows, following the original staple line.
- Keep the felt folded flat to avoid creases.
Frame breakdown comes next. The slate bolts are often buried under the cloth, so strip the felt first to expose them. Number each slate piece before lifting. The frame itself will surrender once you remove the corner brackets and centre supports. Each step brings you closer to the bones of the table, and knowing how disassemble pool table properly ensures nothing is lost to haste.
Separating Slate Seams and Marking Slate Orientation
With the felt rolled away, the slate bed lies exposed in three distinct slabs. They sit joined by beeswax and a thin seam of filler. Before anything moves, trace the seam lines with chalk. The bed is heavier than it looks, and the seams are where it will separate, not break.
Number each slab with a pencil on the underside and mark the orientation with an arrow pointing toward the foot end. This is not busywork. When you know how disassemble pool table frames properly, you also know that replacing a slab in the wrong rotation changes the playing surface by millimetres.
- Loosen the connecting bolts at each seam before lifting any slab.
- Work from the centre slab outward to keep the bed stable.
- Lift with a partner, always along the slate’s edge.
The frame underneath is a wooden skeleton held together by corner brackets and centre supports. Once the slabs are off, those fasteners come out in seconds.
Unscrewing the Slate from the Frame Using a Socket Wrench
Now that the three slabs are free, the frame reveals its actual structure. I reach for a socket wrench with a deep socket, because the bolts holding the slate to the frame are often recessed into the wooden crossmembers. A standard wrench will strip them. Worse, it will chew the wood.
Work in a spiral pattern from the centre of each slab outward. This prevents the frame from twisting as the load shifts. The sequence matters more than speed.
- Fit the socket over the bolt head and apply firm downward pressure before turning.
- Remove the bolt completely, move to the next one across the frame.
- Set every fastener in a labelled container before lifting the slate.
Once all bolts are out, the frame breaks down into its base components. Knowing how disassemble pool table this far means the heavy work is finished. The rest is sorting timber and hardware.
Enlisting Proper Lifting Technique for Heavy Slate Pieces
Each slate slab carries surprising heft. I plant my feet shoulder width apart, bend at the knees, and grip the slab along its reinforced edge. The first lift tests your grip. The second tests your nerve. A full size slate piece can weigh close to ninety kilograms, so two people are essential.
Before any lift, I confirm the slate edges are clear of debris. Then the crew coordinates the move in unison.
- One at the head, one at the tail, one at the centre.
- Lift together on a count of three.
- Carry the slab to a padded surface, never flat on concrete.
- Place spacers between stacked slabs to prevent pressure cracks.
With the slate clear, the frame exposes its joinery. The crossmembers detach in sequence and the structure folds into manageable timber. Each part labelled, each fastener bagged. This is where knowing how disassemble pool table properly pays off.
Disassembling the Frame Legs, Aprons, and Cross Supports
The slate is gone, and the frame now stands exposed as a timber structure. The aprons, legs, and cross supports each carry a specific load, so the order of removal matters as much as the bolts themselves. I work from the inside out, releasing the cross supports first because they hold the aprons under tension.
A standard frame breakdown follows this order:
- Remove the cross supports using a socket wrench.
- Detach the aprons from the corner brackets.
- Lay the legs flat and unscrew the mounting plates.
Each leg on a full size table carries a portion of the combined weight, so I keep one hand on the leg while the other works the bolt. The timber frame itself is rarely damaged, but the fasteners often are. Knowing how disassemble pool table frames in the correct sequence prevents stripped inserts and keeps the structure square for reassembly.
Categorizing Hardware into Ziplock Bags with Written Notes
A drawer full of mixed bolts is the first sign of a reassembly nightmare. Categorizing hardware into Ziplock bags with written notes turns that chaos into a clear map. I sort by component, not by size, because the cross support bolts and the leg bolts rarely share the same thread pitch.
1. Bag the slate bolts separately from the frame fasteners.
2. Label each bag with the exact removal order.
3. Place the labeled bags in a single bin for the table.
That little act saved me hours on the last rebuild. The written note on each bag acts as a physical checklist, which is better than memory. When you know how disassemble pool table correctly, you understand that the last hour of teardown saves the first hour of setup.
Packing, Labeling, and Transport Preparation
Wrapping Slate Edges with Cardboard and Foam Padding
The slate’s fragile edges usually suffer damage during transport preparation, not during the how disassemble pool table process. After marking orientation, wrap each edge with corrugated cardboard, then closed cell foam.
Use tape to secure the padding, but avoid over tightening! Before wrapping:
- Inspect for chips or cracks.
- Remove dust from the seam.
- Align cardboard seams with slate seams.
For larger pieces, wrap twice around the perimeter. Then place each slab into a moving blanket. Label every piece with a matching code. Keep a written map in your hardware bag. Finally, secure the wrapped slate upright in the moving truck.
Protecting Rails with Shrink Wrap and Corner Guards
Once the slate is wrapped, the rails deserve the same level of care. Shrink wrap protects the cushion noses from compression and keeps dust off the cloth. Start at one end and rotate the rail as you pull the film tight, but do not stretch it to its limit. Too much tension distorts the rubber profile and will ruin the rebound.
Corner guards absorb the impact of loading and unloading. The most common damage happens when a rail slides against another piece in the truck. Fit a guard on every corner, including the inner ones where bolts protrude.
Mark each rail with a letter on the cloth edge, then record the same letter in your hardware map. When you understand how disassemble pool table properly, you realise that labelling is the cheapest insurance you can buy.
In any how disassemble pool table guide, the packing phase separates careful movers from expensive mistakes. Slow down, check every wrap, and load the rails flat. The payoff appears at reassembly.
Creating a Master Inventory List for Every Table Component
Before any crate or trailer sees your table, you need a master inventory list. This single document ties your entire teardown together. On it, record every component, from the smallest washer to the largest slate slab. I start with a numbered checklist and photograph each item as it comes off. A verbal description alone invites confusion later, especially when two bolts look identical.
My list captures the following:
- The exact location where each component was removed
- The label letter assigned to rails and slate pieces
- The contents of every ziplock bag sent to the truck
When someone asks how disassemble pool table without losing parts, the answer comes back to this list. Transport preparation becomes straightforward once every item has a reference number. You will know precisely what sits in each padded corner of the trailer, and you can check it off upon arrival.
Reassembly Considerations and Common Pitfalls
Taking Room Measurements and Doorway Clearance Before Moving
Measure every doorway, hallway, and stairwell before you lift a single piece. Slate is unforgiving, and a table that cannot pass through a passage will trap you mid-project. Most doorways in South African homes open to about 80 centimeters, but heritage properties often have narrower frames. Record the width at every turning point, not just the obvious entry.
One reassembly pitfall is ignoring the original order of components. The frame must sit perfectly level before the slate touches it. Another mistake is over-torquing the bolts, which stresses the slate and leads to hairline cracks months later. Check these points before you move:
- Stairwell width at the narrowest section after banisters
- Landing space for rotating the table horizontally
- Door heights once the corner castings are removed
Anyone searching how disassemble pool table should also plan where it will travel afterward. When you map the return journey first, the separation becomes effortless. Good preparation turns reassembly into a quiet satisfaction rather than a desperate struggle.
Avoiding Cracks and Chips During Slate Reracking
Reassembly tests your patience more than your strength. When reracking slate, the seams require complete focus. A single grain of debris between the frame and slate creates a pressure point that cracks under the weight of the cloth and balls. Wipe the frame rails with a tack cloth before positioning the first slab.
Lower each slate piece straight down. Never slide it. Sliding scrapes the underside and chips the edges where seams meet. Use seam filler or beeswax to create a continuous surface. The seam must feel flush to your fingertip, not raised and not sunken.
- Place the middle slate first, then the two end pieces
- Check the level across all three pieces before tightening anything
- Tighten bolts in a crisscross pattern, two turns at a time
Knowing how disassemble pool table is only half the skill, since the reverse process demands equal care. Rushed reracking produces hairline fractures months later. A slow, methodical approach prevents chips, cracks, and costly replacement.
Replacing the Cloth or Reusing the Existing Felt
Understanding how disassemble pool table only matters if reassembly respects the cloth. Reusing existing felt is tempting, but old stretch marks and staple holes betray the original tension. Replacing cloth demands a different discipline, one where patience outweighs speed.
Common pitfalls hide in the details:
- Pulling the felt unevenly across the side rails
- Forgetting to trim excess cloth before bolting the cushions
- Misjudging the staple spacing along the curved nose
Each mistake creates an uneven playing surface. The slate level means nothing if the felt shifts during play. Careful tension and consistent stapling prevent the most costly rework.
Understanding the Need for Slate Seam Wax or Beeswax
As the slate pieces return to their cradles, the seams between them demand more than blind faith. Water or moisture finds the smallest gap, and a damp cloth over a swollen seam plays poorly. The correct approach involves slate seam wax or beeswax, worked into the joint with a putty knife, then scraped flush with a straight edge.
The wax serves a quiet purpose. It seals the seam against dust and chalk, and it stops the cloth from tenting over a microscopic ridge. A level slate still plays badly if the seam telegraphs through the felt.
– Spread the wax in a thin, even bead along the mating edge.
– Rub the pieces together to compress the joint.
– Scrape away the excess before the wax hardens.
– Sand the dried wax smooth with fine grit paper.
Neglecting this step creates a visible line across the playing surface. The ball stutters when it crosses that line, and players blame the table, not the assembler. Reassembly becomes a lesson in patience, where the seal matters as much as the bolts. Understanding how disassemble pool table properly means respecting the slate’s fragility and the wax’s role in restoring it.
When to Hire a Professional instead of DIY Disassembly
Reassembly rarely follows the exact reverse of teardown. Slate pieces shift, bolts resize,and cloth wrinkles appear where none existed. One misaligned seam can ruin the playing surface;B over-tightening a bolt may crack the slate. Patience plays a larger role than strength. Rushing leveling assumes the frame is square; recheck every joint after tightening.
Understanding how disassemble pool table correctly reveals when to call in help. Signals demand a professional:
- Rusted or stripped bolts resisting torque
- Warped wood or cracked slate
- Cloth tension requiring a pneumatic stapler you lack
A professional brings laser levels, seam routers and slate-flattening shims. Replacements cost thousands of rand. Antique tables demand expert hands. DIY fits simple take-downs; complex tables demand sound judgment.


0 Comments