Evaluating Your Current Playing Surface
Signs of Wear and Tear That Signal a Swap
Most players only notice wear when the ball starts doing odd things. The cloth might look serviceable from across the room, but up close, it tells a different story. I have seen tables where the cushions have lost their bounce and the bed has developed a ghostly sheen. That sheen often means the cloth fibres have flattened and the playing surface no longer responds to spin.
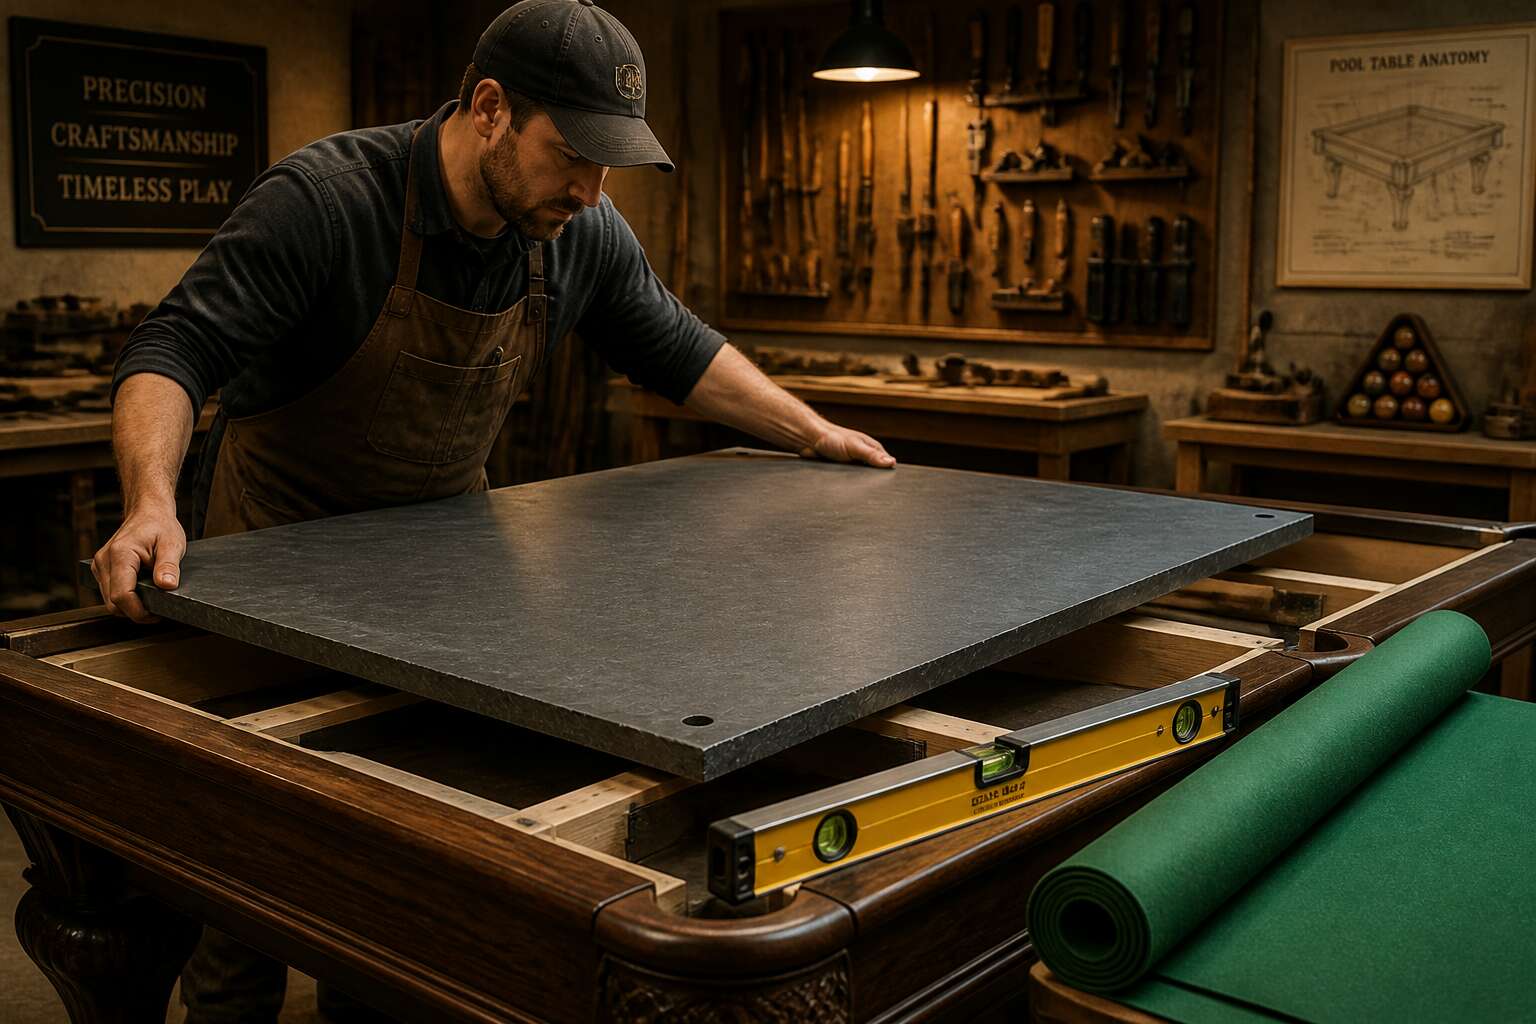
When you start replacing the cloth, you will find the underlying board also needs attention. A pool table top replacement is not a casual weekend task. It requires stripping the rails, lifting the cloth, and inspecting the slate for moisture damage. Signs that point to a swap:
- Persistent ball skidding on straight shots
- Visible ripples or creases in the cloth
- A sticky or shiny patch near the centre pocket
If you see any of these, do not wait. The slate might be fine, but the top layer has done its job. Regular chalk dust and cleaning can mask the issue, yet the accuracy of your game will suffer. Knowing when to act separates a decent player from a frustrated one.
How to Assess the Frame and Cushion Condition
The true cost of a pool table top replacement emerges when you assess the frame. I always press down on each corner and feel for flex. A sound frame remains rigid. Run a spirit level across the slate in three directions. Small gaps indicate a twisted bed, which no cloth can correct!
For cushions, squeeze each rail near the nose. They should spring back with even resistance. A soft or dead spot points to perished rubber. Listen for creaks from the bolts; that sound signals loose timber. Examine the rubber where it meets the cloth for surface cracks.
- Test the corner joints for movement
- Check that the cushion nose aligns with the slate edge
These observations guide your pool table top replacement. A healthy frame and cushions allow a simple resurfacing. A failing structure demands more than new cloth.
Deciding Between Refelting and a Full Bed Replacement
The playing surface demands its own assessment. Run your palm across the cloth and feel for compacted fibres in the scoring lanes. A worn path that refuses to lift with brushing signals the end of the cloth’s resilience. But the bed beneath matters equally. Press into the slate. A solid bed offers no flex whatsoever!
Refelting suits a bed that remains true and level. A full bed replacement becomes necessary when the slate itself has cracked or warped. South African temperature swings cause slate to expand and contract at different rates. I once opened a table to find a hairline fracture running the full length of the bed. No new cloth would hide that fault. That table required a complete pool table top replacement.
Taking Accurate Measurements for the New Slate
Slate beds vary by as much as 6 millimetres across supposedly identical tables. That fact should govern how you approach a pool table top replacement. The playing surface may look straightforward, but its dimensions and thickness determine what the new slate must match.
Measure the bed’s length and width at the centreline, not the edges. Cushion rails often conceal slight irregularities. I prefer a steel tape over a cloth one for this. Record each reading to the nearest millimetre. Slate thickness matters equally. A 25 millimetre bed requires different support than a 40 millimetre one. Check the corners for level. A twist in the frame transfers directly to the new surface.
- Measure length and width at the centreline
- Record slate thickness at multiple points
- Check corner-to-corner level with a machinist’s straightedge
Slate thickness readings at multiple points reveal warping that a single edge measurement misses. The support frame’s top surface carries the new bed, so its dimensions belong in the same record. A pool table top replacement only succeeds when every figure aligns.
Gathering the Essential Tools and Adhesives
Uncovering the truth about your current playing surface takes hands, not just eyes. Glide your palm over the cloth and hunt for high spots, the sort that make the ball veer like a politician dodging a question. Leftover adhesive from a past botch job can ruin the new bed before it settles. Chip it off with a putty knife and flush the frame with sandpaper.
Assemble the necessary kit before you touch the new slate:
- A machinist’s straightedge to expose warps
- Crosslinked silicone adhesive, which tolerates wood movement
- A fine-tipped caulk gun for precise beads
- Wood shims to conquer minor frame wobbles
That silicone adhesive is the quiet hero of pool table top replacement. Too thin, and the bed sinks; too thick, and you create a fulcrum. Pick a product made for slate and spend the extra for quality.
Choosing the Right Material for the New Bed
Genuine Slate vs. MDF: Pros, Cons, and Playability
Most players only notice the bed when it betrays them. A pool table top replacement hinges on one decision: genuine slate or MDF. Slate, quarried and ground flat, delivers the unyielding rebound that keeps every ball tracking true. It is heavy, expensive, and forgiving of decades of play. MDF, an engineered composite of wood fibres and resin, plays acceptably at first but can swell along its seams when coastal humidity creeps in.
Here is the distinction from my time working on tables across South Africa:
- Slate: stable, precise, demands a sturdy frame
- MDF: light, affordable, vulnerable to moisture
The competitive player still favours slate for any serious pool table top replacement. The cheaper MDF bed trims costs but tests your patience when a shot suddenly loses momentum for no visible reason.
Understanding Speed Cloth and Their Impact on Ball Roll
Most players never think about the bed beneath the cloth until the ball curls off line. The material you choose for the new bed determines more than durability. It sets the stage for how cloth grips and releases the ball. A rougher composite surface creates micro-friction that slows the roll. A precisely levelled slate bed lets the cloth do its job without interference. When you plan a pool table top replacement, factor in the cloth as part of the system, not an afterthought.
Speed cloth changes everything. Its tighter weave and lower nap reduce drag. Balls travel faster and hold their line longer. But speed cloth demands a flatter bed. Any undulation becomes magnified. On a worn or uneven surface, fast cloth amplifies mistakes.
- Choose a worsted wool blend for consistent speed.
- Match cloth weight to room humidity.
- Test the bed’s level before cloth installation.
The right bed and cloth work together. A thoughtful pool table top replacement respects that relationship.
Vinyl and Laminated Surfaces as Budget-Friendly Alternatives
Somewhere between plywood and premium stone sits the vinyl composite bed. It asks for a pool table top replacement budget that won’t induce heart palpitations, while still delivering a predictable roll for bar players and weekend warriors. The laminated surface shrugs off spills and scratches, a genuine blessing in highveld humidity where wood tends to swell.
Weigh these factors before committing!
- Check the core density; a flimsy core translates into dead spots.
- Inspect vinyl thickness. Anything below 0.8 mm wears through quickly.
- Confirm adhesive compatibility with your existing frame.
These materials will not fool a tournament player, but they serve the recreational table that still sees action.
Camber and Bedding Profiles: What Works with Your Cushion
Three millimetres of crown separates a true roll from a tragedy. You have paid for a pool table top replacement, yet the cushion profile decides whether that bed earns its keep. A flat bed with mismatched cushion angles forces balls to stutter across the surface. Camber, the deliberate rise toward the centre, must align with the cushion nose height. Low cushions paired with a thick bed raise the playing surface; every bank shot becomes a gamble.
Check these pairings:
- K55 profile with a 2.4 mm bed rise for recreational tables
- K66 profile with a 3.2 mm rise for tournament grade action
Bedding profiles require shims to match the frame’s support beams. Skip this and the table develops a wobble that ruins concentration. Match the bed material to the cushion’s rebound. Slate wants a firm, dead bed. Wood composite prefers a little give. Your pool table top replacement succeeds only when the bed and cushion speak the same language.
Sourcing a Custom-Cut Bed from Specialty Retailers
Nobody thinks about the bed material until the cue ball rolls dead. That moment decides everything.
Choosing the right material for the new bed means matching it to the frame’s support structure, rather than simply picking the thickest slab available. Wood composite absorbs vibration differently from slate, and your cushion rebound tells you which one the table expects. A specialist supplier will ask about the cushion profile and room humidity before recommending anything.
Sourcing a custom-cut bed from specialty retailers removes the guesswork. These suppliers measure the support beams, cut the bed to the exact footprint, and pre-drill the adhesive channels. A pool table top replacement done this way keeps the surface level and protects the frame from uneven pressure.
South African hardwoods move with the seasons. A retailer who understands local timber will build that tolerance into the cut. During a pool table top replacement, this level of care matters more than the cloth you choose.
Removing the Old Bed and Preparing the Frame
Disassembling the Cushion, Felt, and Rail System
The first crack of a rail separating from the frame is unmistakable. That is the moment the old bed stops being a playing surface and becomes cargo. I start with the rail system, since the cushions and felt are locked beneath those heavy wooden members.
Once the rails lift free, the felt comes next. A staple puller and a steady hand are all that stand between you and the cloth. Then the bed itself, whether slate or MDF, lifts off in sections.
Preparing the frame requires a close inspection of the support beams and the leveling wedges. Every shim and screw must be accounted for before the new bed arrives. This is the quiet phase of a pool table top replacement. The work feels simple, but the frame determines how the new bed will sit. A proper pool table top replacement stands on this preparation.
Detaching the Damaged Slate Without Warping the Frame
The old slate has a habit of reminding you about gravity. A three piece bed weighs more than a Land Rover’s spare tyre, and a careless lift will damage the frame. A proper pool table top replacement starts here: detach the damaged slate section by section, lifting each piece straight up. Tilting or dragging it will twist the frame’s miters, and that is a mistake you will feel on every bank shot. I have seen perfectly good frames ruined by impatience.
Once the old bed is gone, the frame gets a full audit:
- Scrape away dried adhesive with a putty knife.
- Check the leveling wedges for movement.
- Inspect corner brackets for cracks.
- Replace any sagged support beam before the new bed arrives.
This quiet inspection determines whether your pool table top replacement succeeds or fails.
Dealing with Stubborn Adhesive, Screws, and Staples
The old bed resists. Adhesive from 1982 has hardened into a crust. Screws are rusted. Staples have sunk into the frame. A pool table top replacement without a plan is a workout. Soften the adhesive with a heat gun and scraper. Work the glue off in strips. For screws still holding, use a torx driver. For stripped heads, use a reverse spiral drill bit.
Here is the order I use:
- Score the adhesive with a utility knife.
- Heat the residue with a heat gun.
- Scrape with a putty knife.
- Remove screws with an impact driver.
- Pry out staples with end cutting pliers.
Keep the frame free of debris. Old glue creates a high spot under the new bed. That high spot turns into a wobble on your break shot. Your pool table top replacement succeeds when the frame is clean and square.
Sanding and Repairing the Wooden Support Structure
The bare wood stares back at you with an unforgiving honesty. The real pool table top replacement begins here. Sanding the runner beams demands a steady hand. I search for wane and deep gouges. If the timber is cupped, the new slate will rock.
I follow a precise sequence for this part:
- Inspect all cross-braces for structural cracks.
- Sand the entire frame with an 80-grit belt sander.
- Fill any splits with two-part wood epoxy.
- Plane the high spots with a jointer.
Repairing the wooden support structure is a meditation. You must trust the level and the straightedge. A hairline fracture today becomes a rogue bounce tomorrow. I leave the surface bare, letting the fresh wood breathe before I lay the new bed.
Protecting the Legs and Body During the Swap
There is a moment when the old slate lifts free, and the frame feels lighter, almost fragile. Removing the bed is careful work, not demolition. I work from the corners inward, because that is where the frame holds its tension. The legs are the first thing I shield. One careless slide can gouge a leg that has stood for decades!
To protect the body during a pool table top replacement, I follow a simple ritual:
- Pad each leg with moving blankets.
- Wrap the frame’s outer rim with tape and cardboard.
- Keep the rail bolts stored in labeled jars.
Then I vacuum the cross-braces. The bare frame waits for its new slate, patient and clean.
Installing the New Playing Surface Like a Pro
Dry-Fitting the New Bed to Check for Gaps
When the new slate arrives, the first temptation is to screw it down. Resist! I once watched a craftsman dry fit the bed and run his palm across the seam. He found a 2 mm gap that would have become a dead spot. That single discovery transformed my approach to any pool table top replacement.
Lay the new surface on the support frame without adhesive. Check each joint with a feeler gauge. The bed should sit flush across all sections. If gaps appear, shim them with thin veneer strips. Never force the slate with clamps, as that introduces stress into the frame.
- Inspect the level across the entire playing field
- Verify seams align with the cushion pockets
- Mark low spots for correction before gluing
This dry run takes twenty minutes, yet it saves hours later. A precise fit here ensures your new bed plays true for years. The patience is worth every second.
Applying Adhesive Evenly and Avoiding Bubbles
Adhesive application separates a professional pool table top replacement from a botched weekend project. I use a notched trowel and spread the compound in a serpentine pattern across the support frame. That method allows air to escape laterally as the slate settles.
A common mistake is drowning the surface in glue. Excess adhesive squeezes out, hardens, and creates a raised lip under the felt. You will feel that imperfection on every subsequent shot.
- Apply a thin, consistent layer over each support beam.
- Lower the slate gently from one edge, letting gravity compress the adhesive.
- Check for bubbles along the seams before the compound sets.
Bubbles form when the slate is pressed down too fast. Work slowly and let the weight of the stone do the job. A clean bond keeps the playing surface dead flat, and your pool table top replacement holds its roll for years.
Clamping, Curing Times, and Weight Distribution
Clamps hold the new bed still while the adhesive cures. I stagger them across the frame, turning each screw with even pressure. Curing times demand patience; a rushed pool table top replacement will show its failure in a slight rise beneath the felt.
Weight distribution matters just as much. Sandbags and lead ingots, placed over the support beams for a full day, settle the bond without flexing the slate. The stone must rest as one continuous plane.
Use this order for the clamps:
- Longest edges first.
- Check each joint with a straightedge.
- Add weight only after the adhesive begins to tack.
Reattaching the Cushion and Rails for a Seamless Fit
A cushion that misbehaves turns a routine shot into a gamble. Installing the new playing surface starts with the slate, but the rails determine whether the pocket accepts or rejects the ball. I set the cushion bolts loosely first, letting the rubber seat itself against the fresh cloth, then torque each fastener in a star pattern. This pool table top replacement step demands precision, not strength.
Reattach the rails in a deliberate order.
- Align the rail joints with the pocket openings.
- Press the cushion nose to a consistent height.
- Tighten the bolts gradually from the centre outward.
The cloth must never bind under the rail. Check each gap before the final turn. When everything settles, the ball should move true, with no hesitation at the seam.
Stretching New Felt and Bumpers Around the Rim
Stretching new felt across the slate is the moment when a pool table top replacement reveals its true quality. I learned this after watching a professional technician spend four hours on a single bed. The cloth must be pulled with even tension, working from the centre to the edges. Bumpers require a separate touch, seating them against the cushion nose without compressing the rubber.
Here is how I sequence the installation:
- Lay the felt with the backing side up and smooth out any creases.
- Staple the centre line first, then work outward in alternating passes.
- Press the bumpers into place, checking that each edge aligns with the rail joint.
The reward comes when the cloth snaps taut and the bumpers respond to a finger press. No wrinkles, no dead spots! That is the sign of a professional finish. Every subsequent shot depends on this level of care.
Final Leveling and Surface Polish for Tournament-Grade Play
The real test of any pool table top replacement happens after the felt is down. I place a machinist’s level across the slate in six positions. Each reading must align within thousandths of an inch. I adjust the leveling screws until the bubble holds perfectly. Tournament-grade play demands that precision.
Then I move to the surface polish. A fine microfibre cloth removes residue without disturbing the nap. I check for any raised staples or uneven seams. My final pass uses a static brush to lift the cloth fibres. This restores the ball roll exactly as intended. Players notice the difference immediately!
Caring for Your Rebuilt Table Bed
Daily Cleaning Habits to Preserve the Playing Field
A pool table is never truly still. Even after a flawless installation, dust motes settle, chalk dust drifts into the felt, and the slate holds the memory of every shot. You have invested in a pool table top replacement, and this new bed deserves protection. The felt is the thin skin between your game and the cold stone below. It will absorb oils from careless hands and the grit from a passing boot if you let it.
I will tell you plainly that a daily sweep changes everything. A soft microfiber cloth, used in the direction of the cloth nap, picks up what settles overnight. Do not press hard. The fibers are delicate, and friction is the enemy of a smooth roll.
– Use a dedicated brush for the slate, never the one from the fireplace.
– Keep drinks on a side table, not the rails.
– Check the cushions weekly for a thin layer of chalk buildup.
Heavy moisture on the playing surface is poison. A damp cloth for the wooden frame is fine, but keep it far from the felt. The slate underneath is sealed, but the cloth breathes, and moisture will warp its tension over time. Trust me, the ghost of every game lives in that tight weave, and only gentle habits will keep it honest.
Managing Humidity to Prevent Future Warping
Humidity affects a rebuilt playfield more than most owners expect. After a pool table top replacement, the new bed requires stability. Wood swells and contracts as moisture shifts in the air. The frame transmits that movement directly to the slate bed and cloth.
In South Africa, humidity varies dramatically. Coastal cities like Durban experience high moisture year round. Johannesburg settles into dry winters. Each climate demands attention.
Use a hygrometer near the table and check readings weekly. A dehumidifier helps in humid seasons. A humidifier prevents the cloth from becoming brittle in dry months. Keep the room between 40 and 60 percent relative humidity.
Spot-Repairing Scratches and Nicks on the Surface
Once the humidity is under control, the bed’s surface still endures daily wear. A stray cue butt can leave a nick. A carelessly placed drink can scratch the cloth. These blemishes are not a reason for another pool table top replacement, but they do need attention.
Spot-repairing scratches and nicks promptly keeps the bed playing true. Start with the smallest repair. Use a fine grit sandpaper only on the slate edges. For felt or speed cloth, snip loose fibres with a razor blade. For a deeper nick, apply a thin layer of clear adhesive and press it flat.

0 Comments